
For most of us, working from home has become either a real drag or a personal boon. So whether you like it or hate it, remote work has given a lot of people an opportunity to explore new interests and even start a side hustle. One of the easiest and most common ways to make money online is starting a blog. Becoming a blogger is actually pretty simple these days.
You can spin up a pretty nice template site on one of a dozen platforms, but this article isn't going to cover the getting started phase. I'm going to assume you're already up and running and have written a few posts. Now it's time to make it better, get more readers and get them to engage and share your content around the web.
A quick search on google for "blogging tips" will return you thousands of smart and useful strategies to make your blog better. That's great, but if you're new to all this you probably found that many of these tips are kinda esoteric (i.e. high level and not so easy to implement).
Remember, keep it simple at first. Don't get overwhelmed with the million best practices you've heard or read about. This article will run through ten straightforward ideas for your new blog that you'll be able to start using fast and seeing results even faster.
#1 Use screenshots and annotations that get noticed and get shared
Adding images, infographics, pictures and other visuals to your blog posts is a tried and true method to increase engagement. But making great visuals is not actually that easy. Sure, searching Unsplash will give you a ton of free photos to add to your post, but these really don't stand out anymore. On top of the fact that everyone does this (so you're unlikely to pick an image that wasn't used by many others) static photos just don't tell much of a story.
They're a one trick pony so to speak. Even if you are clever with your photo selection, the best you can hope for is a quick smirk or smile from you readers. The truth is people aren't going to stick around just because you had a pretty picture of a road going into a forrest indicating your blog post is about to take the reader on a journey.
And, unless you're also a closet graphic artist or ready to drop a chunk of change, creating infographics or original images from scratch is not going to be viable. Tools like Canva are good for taking quotes, stats or other key points and make a quick visual graphic with them. But to visually explain parts of your blog post, screenshots and image annotations are going to be your best bet.
Use Markup Hero to take screenshots or upload images and add annotations. It's fast and easy. Here's an example: say you're writing a blog post on the best camping backpacks. You want to highlight certain features of each backpack and point out which ones are going to work in certain situations.
- A quick screenshot to grab a picture of the backpack
- Add arrows, callouts and highlights to point out key features
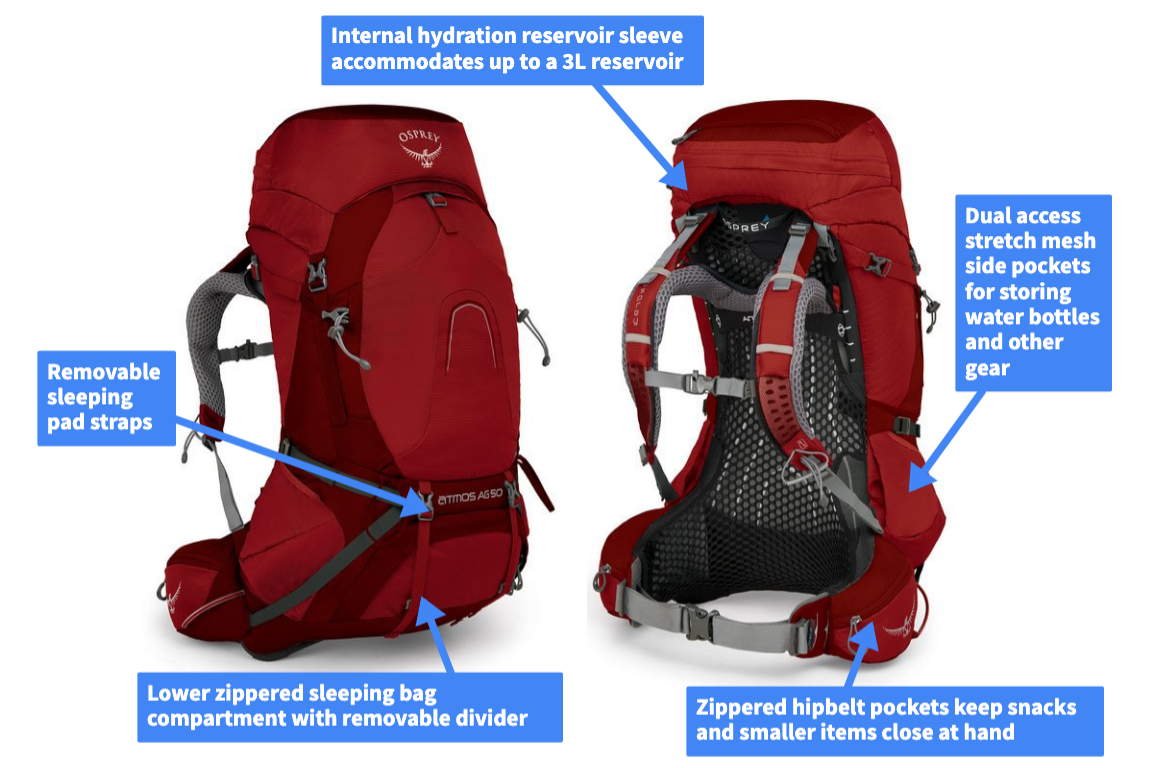
Yup, that image took me all of 3 minutes to make and frankly it's easier to understand than Osprey's own website for this backpack. Using Markup Hero to create image annotations like this are a great way to make your blog post stand out. Here's what you'll get:
- Easy and fast to create
- Super quick for readers to understand
- Very sharable on social media
- Stands out in Google search results
#2 Make your subscribe button an actual benefit
Just about every blogging tips article you read will tell you to start collecting emails and building a list from day one. Yep, do that, but also make your CTA (call-to-action) to subscribe something compelling — an actual benefit. Let's compare
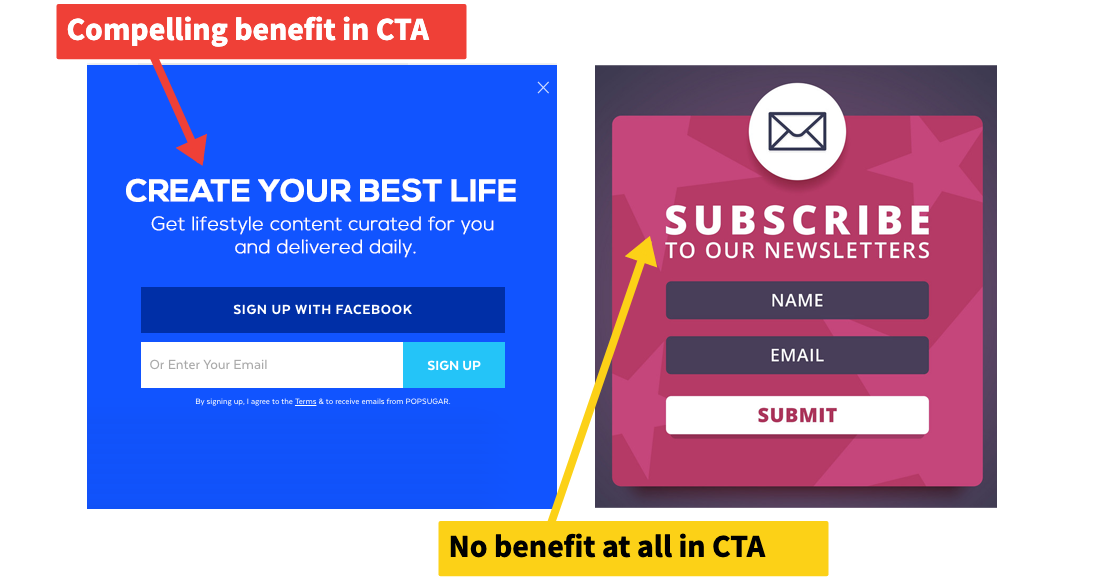
In the first example, the benefit of subscribing is front and center. The CTA says "hey, if you want to have an amazing life, subscribe and get lifestyle tips sent to you daily." Whereas in the other example the offer to "join our subscriber list" is not really compelling; yeh, it's what you want users to do, but what do they actually get for subscribing. Take this statistic as more proof. The popular digital marketing blog, Copyblogger, did a study and found that newsletter subscriptions jumped as much as 254% when a value oriented call-to-action is used over a basic subscribe button.
This is a really easy one, particularly if you're using Wordpress or another blogging platform. Or you can trigger a popup when the user is inactive. If we're sticking with the camping theme from tip #1 above, I would just change the CTA title from "Subscribe" to something like "Make Every Camping Trip Awesome - Get Weekly Tips on Camping and Backpacking".
#3 Make awesome blog post titles
Making good titles is another obvious tip, but often overlooked or poorly executed. But it doesn't have to be that hard. Over time you'll get better, but here's how to start out with good titles from day one. First, try a blog title generator tool. I like the one from Impactbnd here. Just enter a keyword that encompasses the essence of your blog post and you'll get great titles with a quick click.
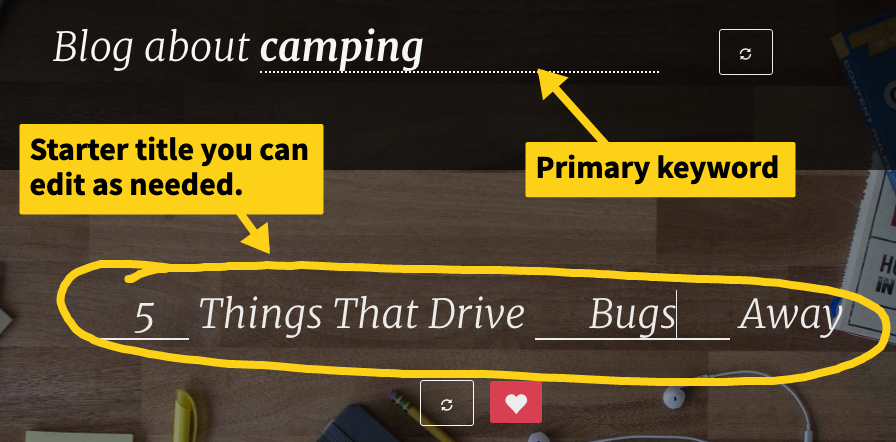
Another quick tip for generating titles is to use the formula below; then just wordsmith the 4 items. And use the blog title generator to help fill in the gaps.
- Start with a number — 5
- Think about the primary the keyword of the article — Car Camping
- Come up with the biggest value provided by the blog post — Drive Bugs Away
- Add in a surprising and beneficial metric (if you can't find one) — Zero Bug Bites
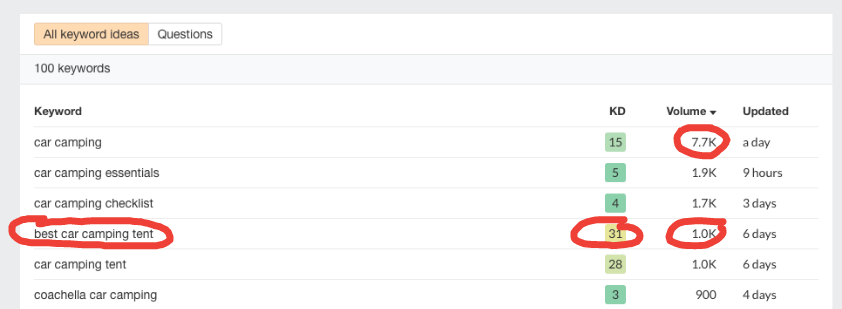
Finally, if you're feeling up to the task, you can do a little keyword research to help come up with titles that match what people are actually looking for. I didn't include keyword research in this blog post because it can be a ton of work. And while it's really important and you'll need to do it eventually, don't get overwhelmed at first. If you're ready to dig into this one, go ahead and check out Neil Patel's keyword research article. But don't worry about it at first. Once you have a consistent drumbeat of posts going out you can increase the sophistication of picking your posts and titles.
I will give you one pointer to start with though. Use a keyword research tool to find questions people are actually searching for. There are tons of these; I'm a fan of ahrefs keyword generator. You can use it for free to get started too. Here's how you do it:
- Enter the primary keyword of your blog — Car Camping
- Choose 'find keywords' and set results filter to — Questions
- Look through the list and find a good idea — How to Pack a Small Car for Camping
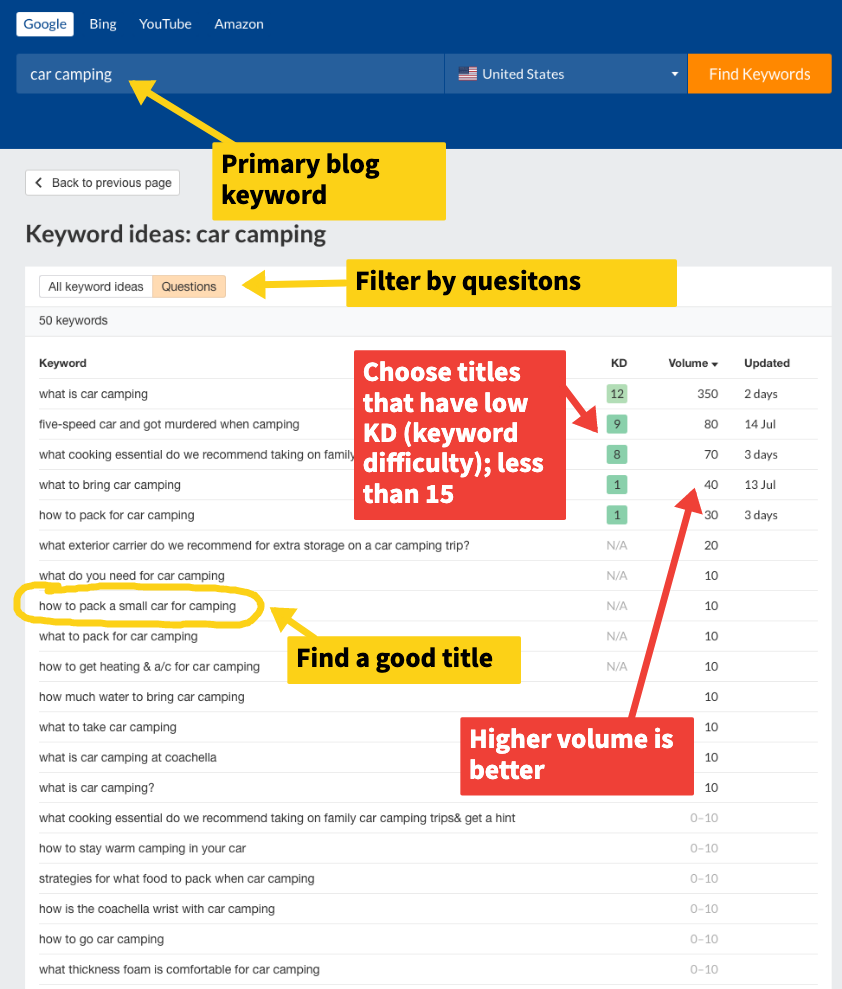
If you're just getting started, don't go overboard. Keep it simple. Pick a title that resonates with you — something you can actually write about. In the example above I found "How to Pack a Small Car for Camping". This is very specific and I could actually write a blog post that answers this exact question. Looking at the KD (keyword difficulty) which represents how competitive the keyword is to get search result rankings, it's N/A which is low or none. You'll want to find something with low KD and high search volume.
At first you want to go for long tail keywords with less search volume because they will be easier to rank on. It may feel counter-intuitive to go after a very small pool of users, but what's better? Getting 5 people coming to a post that answers their exact question "how to pack a small car" or getting no users coming to a blog post about car camping in general. You can work your way up to bigger search keywords after your blog gets some traction. Bonus, you can use a similar approach to coming up with a terrific blog name too.
#4 User numbered tips and lists
One of the most popular blog post strategies is to do listicles, ha, like this one "10 easy blogging tips for beginners". People love lists because they are easy to consume and cover a wide range of solutions to their search query. You can pretty much turn any blog post into a listicle. Take the example from #3 above. How to Pack a Small Car for Camping. That could easily become 10 Tips for Packing A Small Car for Camping. Now there is benefit to keeping the blog post title identical to the search query you found on ahrefs. But Google knows the two titles are generally synonymous — so try both approaches for different posts, or better yet, do both options for the same topic. There is no shame in writing two posts covering the exact same topic. Just make sure they are unique in content and it's your original content of course.
Here's a great article from backlinko.com that outlines the benefits of listicles in much more detail if you want to dig in further.
#5 Submit your blog post to niche bookmarking and re-post sites
I included this one because it's pretty easy, but beware, it can be a big burn of time. There are literally thousands of places to put a link to your blog post and you're likely to get very low click-through from it. My suggestion is to start with 2 sites to post on and stop there for now. You might first search on Google to see if there are any bookmarking or repost sites specific to your niche. For example. If you're a graphic or product designer, you might choose http://www.designernews.co/ to post on as it's specific to that topic. There are also more generic ones like Digg and StumbleUpon, and I've listed a few more below. For a more comprehensive review of social bookmarking sites try this article from Wishpond.
- Growthhackers
- Triberr
- Hacker News
- BizSugar
- Mix
- Delicio.us
- Digg
#6 Don’t be scared to link out
You've probably noticed I've linked out to other sites and blog posts a good amount in this article. Don't be afraid to do this, especially early on. The fear is that your users will leave your site and never come back. Generally this isn't the case. Be sure to open links in a new window (easily done with any blogging platform). I've found linking out to be beneficial for a few reasons. First, it lets me focus my blog post more. Sure, I could dig into a particular topic but if I've already found a great article where someone else has done the research and writing, why not just send my users there. Then I can focus on my own unique content that isn't readily available elsewhere.
Moreover, when it comes to list and tips like this article, my goal is to tell you the tip and give you some quick and easy pointers. If my reader wants to dig in and learn more, I'm happy to send them to a post that does just that. I know my readers appreciate the nuggets of info I provide. Sometimes it's enough and sometimes it's not, I give the decision power to my users instead of assuming I need to go deep on every topic.
#7 Post to Medium.com with a canonical link
This is a little trick I've only recently started doing and am seeing pretty solid results from. First let me say it's bad practice to re-post your entire article on other sites. Google and other search engines frown on this practice as they are unable to tell which is the primary source and often penalize sites that do this. There is a trick to telling search engines which article is the original and which is a re-post though, it's called canonical linking. In simple terms a canonical link is something in the header (code) of the web page that says "hey, this isn't the original version of this article, please disregard and go here to see the original". And Google is cool with it.
Implementing a canonical link can be tricky because you'll need to modify the actual HTML code to do it. However, some sites give you an interface to add the canonical link directly into the post meta data. Medium.com does this. If you aren't familiar with Medium, it's another blogging platform and one you might consider to actually create your blog on. There is a lot of debate on the subject; after a good amount of research, my conclusion was not to use Medium for the Markup Hero blog, although I do use it for my personal blog. And that's where I re-post my Markup Hero articles with a canonical link. And here's why I do it.
1) Medium has a ton of traffic - while I'm not getting any SEO benefit from re-posting articles on my Medium page, I'm still getting found from searches directly on Medium. People go to Medium, search for "blogging tips", find my article, read it on there and potentially follow me on Medium or click through to Markup Hero.
2) It builds my personal brand - People follow me and get notified when I post something new. I'm building a secondary audience on Medium that is valuable for my current business and anything I do in the future.
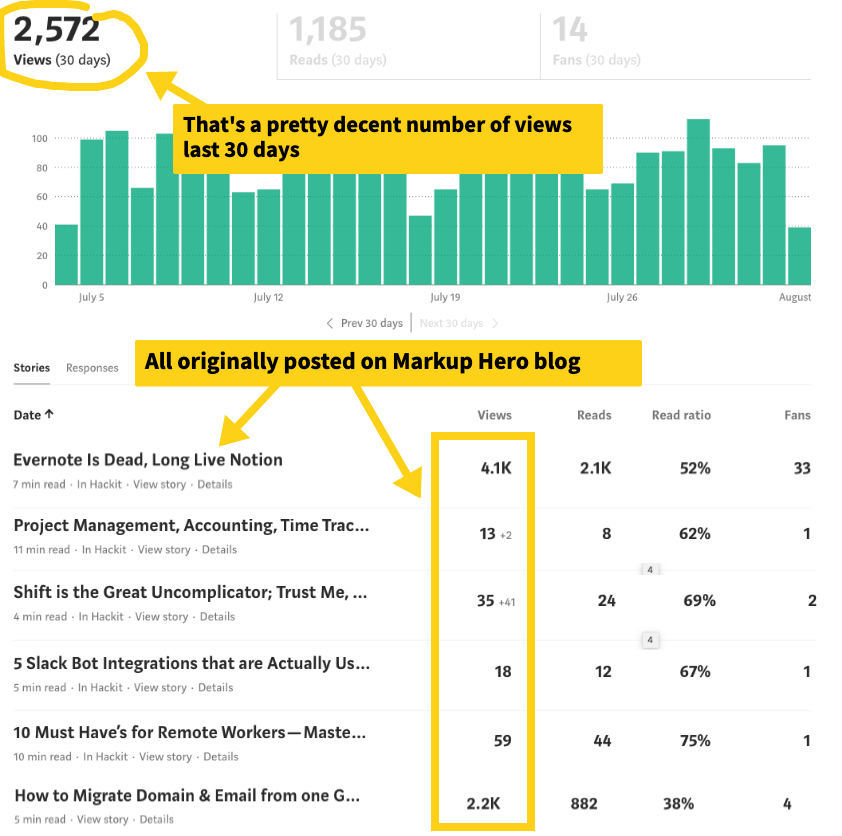
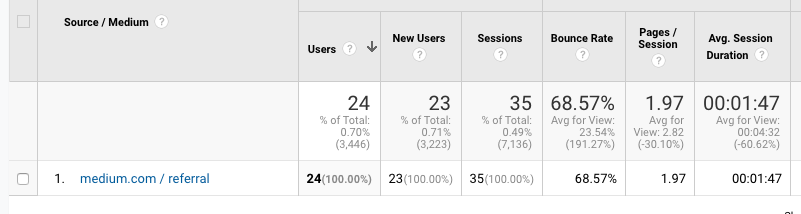
3) I get traffic directly from Medium - Looking at Google Analytics, I do in fact get click-throughs to our blog directly from Medium as shown below for the last 30 days.
#8 Post on your social accounts
This is the most obvious one and you're probably already doing this. But I want to outline my step by step approach here that is actually manageable for a new blogger. First, pick the platforms that make sense. I don't use Instagram for Markup Hero. Sure, my users are there, but they generally aren't on Instagram to find SaaS tools. So I just decided it wasn't worth the extra effort for now. If you're blog is about car camping, maybe Instagram is a better fit. Certainly if you're blog is about throwing awesome dinner parties, then IG is where you want to be. For Markup Hero I focus on Facebook, Twitter and LinkedIn. Here's my process.
- I already had personal accounts on LinkedIn, Twitter and Facebook and you probably do too. If not, create them.
- Create business accounts on the social platforms you choose. For Markup Hero, it's Facebook, Twitter and LinkedIn.
- After I create a new blog post, I make an image or take the cover image from the post and write a 1 sentence blurb about the post focusing on the absolute benefits to people if they read it. An example for the car camping article I might say "Wanna know how to pack a small car for camping" or "Packing a small car for camping is hard, try these 10 simple tips". I customize the blurb for each social platform and often make slightly different images.
- I post the image, blurb and link to the article on each social network
- If I reference any other companies in my article, I'll do an @mention to their social handles in the hopes that they like, comment or re-post. This happens sometimes but I don't over do it, 1 or 2 shout outs per post and different ones per social platform.
- Then I login to my personal accounts on each platform, find the posts I just made, and either like, comment or re-post on my personal feed
- Pro Tip: Save time by just posting the blurb and the link and the social network will automatically grab the image and meta data for you.
The above steps are very easy although if you're feeling daring, here are a few variations that I use:
- Periodically choose an article I'm going to write and post it directly on the social network instead of linking to my blog. This works only with some platforms, LinkedIn in particular has a built-in blogging platform and they generally give more love to articles that are posted directly there vs. linking out.
- Sometimes I flip the above strategy around and post the blurb and link to my article on my personal account first. So I'll go into my personal Facebook, post it there, then go into the Markup Hero account and like, comment or re-post it.
- I'm also a part of some social groups on Facebook and LinkedIn. Most groups explicitly say I can't self promote and post my links. So honor that. But, most groups have specific days or opportunities to re-post my content. When I see the admin of a group prompting users to do this, I'm all over it. Free visibility.
#9 Use statistics to back up your ideas
Using statistics in your blog posts creates more credibility and trust for your readers. The best stats are your own. In this post I've used some of our own stats to articulate points. Using your own statistics is even better than 3rd party stats because readers not only believe what you are saying but also see that what you are saying doesn't just work in general, it worked for you specifically. I also add 3rd party stats when I don't have them, which I've done several times in this post. Neil Patel has another great article on writing data driven blog posts if you want to dig in, but here's my simple approach that is very doable for beginners.
Determine where a stat would backup your point - remember in tip #2 where I talked about the benefit to using specific benefit CTA's over a general subscribe CTA? I needed a stat that I didn't have to back that up.
Find studies, stats or articles that have the data point you need - a quick search for blog subscribe CTA "stats" or "study" got me a bunch of articles to reference.

Sometimes the article you find from the above search didn't actually do the study, but they already found the study to link back to, just copy the same link they use and add the stat to your blog post. Just make sure you don't put a stat into your blog post that you can't backup. I wouldn't say 80% of people that car camp like it better than cabin camping unless someone did some research I could reference that showed that. We also recommend using a tool like Rebrandly URL Shortener in order to track how your CTA's performs.
#10 Use your product, service or expertise as your niche
This one is last because it's the most complex and will likely evolve for you as it is for us over time. If this isn't the first blogging tips article you've read, then you probably already know to create a niche for your blog vs. something more general. The reason for this is because it's easier to get visitors from search if you're not competing with bigger sites. For example, if you're blog is about outdoor activities, which includes camping, you're going to be competing with tons of blogs about camping but also blogs about rock-climbing, parachuting and more. Drilling down to camping only is more niche than outdoor activities, but getting even more specific is better, like car camping. If your blog is specifically about car camping you're more likely to get found by people that are really looking for information about car camping only.
This tip isn't about picking a niche or why thats important. Hopefully you already know this. In the case of Markup Hero, the trick is picking a niche that relates directly to our product. I want to write content that showcases our own product in a way that has people needing to use Markup Hero for their own blog, company or service. The truth is we actually haven't fully done this. If you look at our posts on the Markup Hero blog, you're going to see a lot of different topics. From blogging tips like this article to SaaS product reviews and much more. There is a common thread of using Markup Hero to make screenshots and annotations for any of these topics, so that's good, but we're not maximizing our SEO by throwing a wide net.
This was a deliberate decision however. Our approach has been to build out some initial content (remember, our blog is only 6 months old) that showcases our product in use covering a wider range of topics. Then drilling down more and more niche as we see what resonates. Moreover, because we are aggressively working on a backlinking strategy, which I'll cover in a future post, we needed content that could be linked back to from higher authority sites.
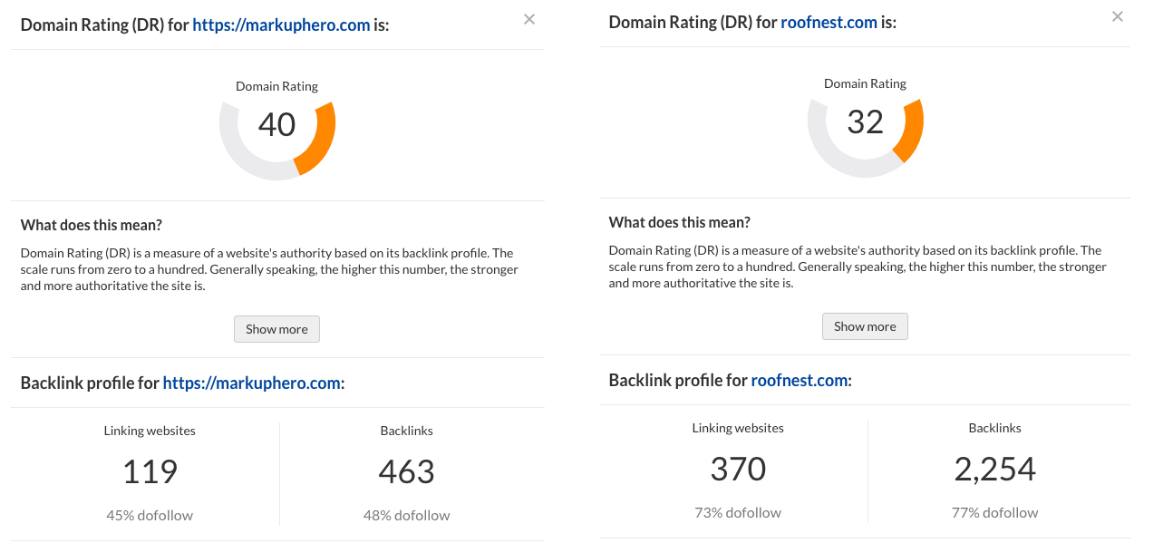
For example, if I wanted to get a link back to my blog from an article about blogging strategies, it's easier for me to ask them to link to a specific article about blogging tips that would be a good fit and of real value to their readers. So by having a wider range of articles on our site initially, I can focus on building our site authority through backlinking, which is in fact working. We've only been at it for 4 months and only have 463 backlinks, which isn't a lot, but the quality of our backlinks are very very strong and our domain rating is already 40. Compare that to this example, in the camping category, which has a domain rating of 32 and has more than 5x the amount of backlinks.
So now that we're starting to see our overall authority go up, we're going to focus on more niche articles and long tail keywords that will start getting ranked on search due to lower competition and higher domain rating. So while I doubt that this article will get ranked anytime soon in the top 30 search results on Google due to the high competition, it is a great article that I can request links to from other higher ranking sites to bump up our domain rating. Then I can write an article with the title "what does it mean to annotate an image" (see ahrefs keyword phrase result below) and have a higher chance of ranking for it.

Summary
Like I said before, keep it simple. You're likely to get overwhelmed and just stuck if you try to implement every blogging best practice under the sun. Start with just a few of the ones I listed above and start adding more as your site grows. Then explore more articles with more tips and maybe even take blogging course. The important thing to remember is whatever you decide to implement, do it thoroughly and consistently and don't take on too much at once.
A good rule of thumb is that it's better to do one thing really well than 10 things with mediocrity. Blogging takes time and commitment. Expect to spend at least a year building your blog before seeing any meaningful results. But the beauty of creating content, blogging and SEO is that it's largely permanent vs. advertising. Whether content marketing for real estate, SaaS, eCommerce or anything else. The content you create lasts forever.
Conversely, when running ads on Google and Facebook or wherever for your business, as soon as you turn off the budget, the traffic stops. Once your articles start ranking on Google, you're likely to have a consistent flow of users forever. It is about planting seeds vs. instant gratification. Stick with it.